In this tutorial, you will be guided through the process of creating a final image using a technique called “Simple Compositing.” The focus of this tutorial is not only on achieving the desired outcome but also on ensuring the safety of your subject throughout the entire process. So without further ado, let’s jump right in and get started.
Why Use the Simple Compositing Technique?
The simple compositing technique is employed for several reasons. Firstly, in certain scenes and situations, capturing the desired shot in a single photograph can be challenging or impractical. For instance, in the example provided, having the couple hold still in the perfect pose and expression while waves crash around them would require significant time and effort. By using the compositing technique, you can avoid wasting time and ensure a higher probability of capturing the desired shot.
However, the most crucial reason for using this technique is safety. In the specific location mentioned, waves regularly splash onto the rocks every 10 minutes or so. While the couple is not at risk of being washed away, the amount of water can still pose a hazard and potentially ruin the shoot. Placing subjects in potentially dangerous situations, such as standing in the middle of the street or in the path of crashing waves, is not safe or responsible. Instead, by quickly capturing a shot with the subjects and promptly moving them to a safe area, you can ensure their well-being while still achieving the desired background or scene in subsequent photographs.

How to shoot for the simple Compositing Technique
Let’s discuss how to take the picture and then discuss the equipment you’re likely to require. Because we’re planning to combine the images, you need to set the camera mounted on the tripod. Any camera on any tripod can be used. To shoot this image for gear-wise I used the Canon 5D Mark IV equipped with the 24 to 70mm focal length.
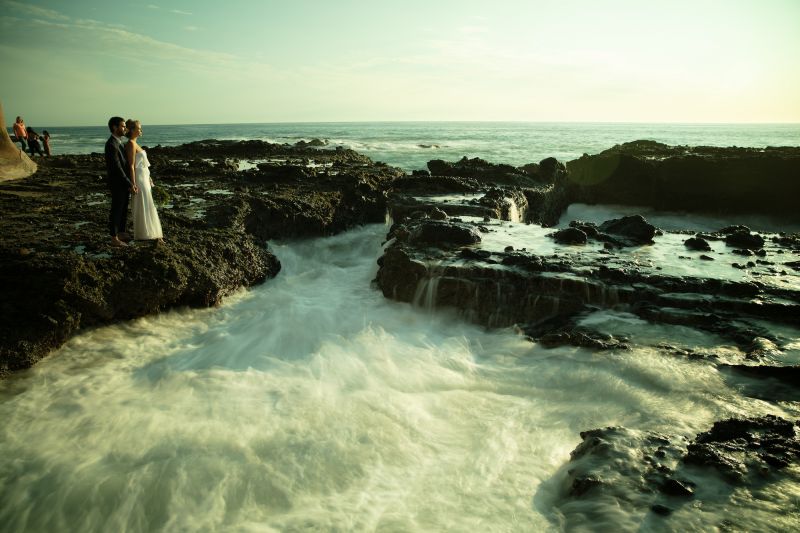
If you look at the photo above, you might wonder what we did to achieve this low shutter speed at F/4 as well as ISO 200 on such a bright day. It’s not a common practice since if we attempt to slow down shutter speed to that level in bright sunlight the photo will be entirely white. There may also be an unpleasant green tint to the photo and we’ll have to rectify after the fact. If you’re considering an ND filter, you’re right. When I took this picture a less than five years ago I used an ND filter. The ND filter I was using was pretty good however it was a fairly noticeable color transition that was not ideal. Modern, high-end ND’s aren’t going to be able to achieve the same. If you’re looking for a solution, I suggest visiting Adorama and looking at their Tiffen Square Water White ND filter. A four or five stop filter will serve you perfectly.
What you might have noticed in earlier instructional videos are that I generally utilize the square ND filter and place it on my lens. I use this method because I’m lazy. It’s the only reason. I’m trying to get into and out of places in the shortest time possible. I’m not planning to use an automatic drop-in filter system. If I was shooting landscapes, I’d suggest acquiring the drop-in filter system. If you don’t buy an ND square or a drop-in filter, then you’ll need step-up rings and step-down rings to fix the filter onto lenses of various sizes, they’re a pain and annoying to use. I’d prefer to get the square ND. If you’re shooting portraits placing a square filter in front of the lens will work fine.
After my camera is setup and set up on the tripod, I’ll ask my subjects to come in for a quick photo and then step out to take a second step. Then, I must wait for a nice wave (in this instance I waited around an hour). The result is a photo of the couple as well as the wave on its own. In the photo above that I was able to capture a few lovely spectators; fortunately, it’s an easy fix post-production. This is all for the photography part.
How to Edit using the simple Compositing Technique
The first thing I’d like to accomplish in post is color-grading. We’ll use Lightroom for this, though you can utilize any other software you’d prefer. When you’re in Lightroom you can open the Develop module. You can then add your preferred preset. I’ve picked Visual Flow’s Modern Pack.
White Balance & Exposure
To see the correct shades, I begin by taking a white balance measurement (press “W” then then click onto her outfit). When we have done this, we can achieve the best white balance by using an adjustment of +65 to the tint. This is how insane the ND filter is. The next step is to reduce the exposure a little. In this case I’ve chosen one of the HDR Natural preset (again, from Visual Flow’s Modern Pack). If you didn’t know that visually Flow presets are created based on lighting conditions. This is why I’ve picked HDR because this photo has an abundance of dynamic range, and I’m trying to make as much of it as much as possible. In the event that you do not have Visual Flow presets, just choose a preset that you like to create the look you love.
Radial Burn

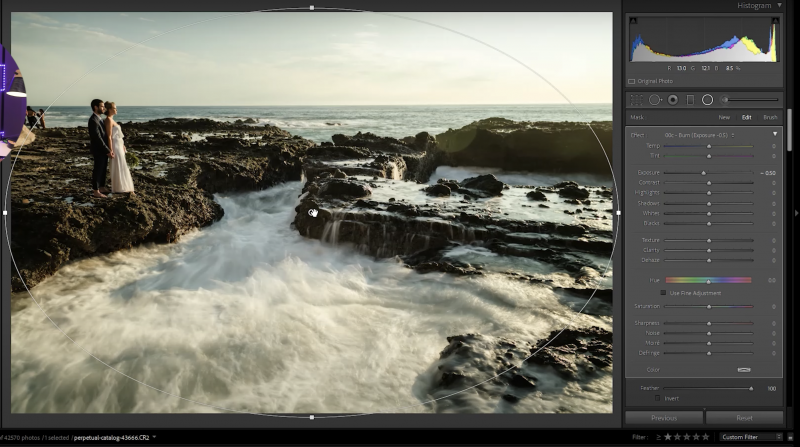
Let’s start with a radial cut. I have a brush that can be used for this. You will have seen in previous tutorials. If you want to make the brush of your choice, it’s just a pinned brush, and reduces exposure in negative 0.5. I’m going to place it to the top of my couple. It is possible to hold and click the cursor on your couple and then move your pin leftwards to increase the intensity that the effects (or to put it another way, to darken the radius burn).
The White Balance adjustment is isolated.
Here’s a little useful trick to control color temperature. I’d like to make the blue hues that are in the picture (not on top of the two subjects) So I’m going to alter the temperature to about negative 10 by using the same Radial Burn brush. Another option with this image is to modify the feathering effect to ensure that as the temperature increases, the changes, it will feather towards the subject. If not, a small amount of blue could spill over the feet of the subject. To stop this from happening you must hold down “Alt/Option” and then use the brush to take off the mask from feet. If we only wanted to manage the temperature, we’d need to separate the two brushes. The temperature is enough for this picture. For more detailed Lightroom tutorials and to be an expert in color grading, check out our mastering Lightroom Course!
The Synchronization of Colors between Images
This next step is vital. You’ll need to coordinate the colors of the images you’re planning to use for the composite. This second image (without any couple) as the plate image. Copy the settings of the previous shot, and then transfer it to your plate image. If you shot the image in manual mode, and you used a tripod, images will be identical apart from the waves, and the couple not appearing either in one or the other. The colors and other elements of composition must match.
Images Layered in Photoshop
Select the two images, right-click and then choose ” Edit in Photoshop.” You’re going to select “Open to Layers inside Photoshop.” This will carry editing by using Photoshop. I call this an easy composite since Compositing can be a complete nightmare which means you could spend long hours or even days working with hundreds of layers in the same Photoshop file. After that, the edit turns into more of a visual art rather than photography. It is possible to save the conversation for the future, but composites come with different levels of sophistication and this one is easy. In order to edit this photo all I need to do is pick the layer that contains almost everything I would like to see in the image (which in this instance will be the photo of a plate) and then drag it up to the top position of the layer.
Then, select each layer (or all the layers you’re planning to edit in an entire composite) and then auto align them. The auto alignment feature of Photoshop will be able to automatically align images. There may be a small shift between the images even when using tripod. Auto align will correct any shift that isn’t needed.
After the layers have been aligned, you can add the layer mask. The mask will expose the picture below. Make use of a white brush show and black to cover the layer beneath. Make sure the brush is set to 100% opacity, and 100 flow. You can use a mouse tablet, or any other device you own. Another reason this is known as simple composite. All I have to do is apply black in the area where the couple is, and then I’m done.
Once you’ve mastered this method and adhere to these steps (using tripod) It’s that simple. You are able to take extra time to work on small details for example, eliminating distracting elements like people in the background, and other things. Save it then, and the picture is completed.
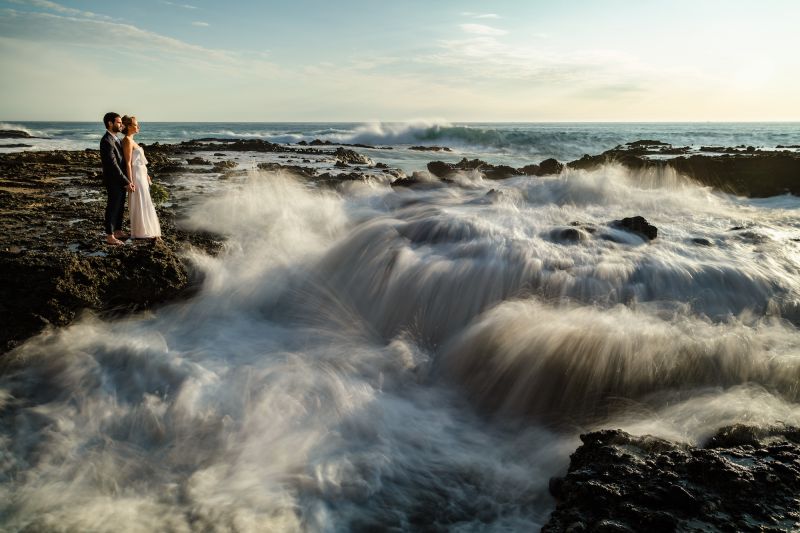
Final Image
Conclusion
Then you’re done! The image has gone from a basic image of persons in the background, and unimpressive waves to a much better final picture. Keep in mind that this technique is beneficial both ways. It makes the shooting process easier and helps keep the workflow running quickly and you’ll be spending a lot of time trying to achieve this in one shot, when you could simply employ this technique and not spend less than five minutes retouching the image in post. Additionally this method will help ensure that you and your clients are secure throughout the entire process shooting. Nothing is more frustrating than getting up to read a news article which states that someone was hurt or even killed in the course of a photoshoot that could have been prevented. By using simple compositing techniques you don’t have to put your customers in danger.
If you liked this article make sure to come in later as I’ll develop this technique in the next installment in which we’ll become a more advanced and mix the techniques of lighting and compositing in order to really blow your mind little.


